Free Potting Bench Plans – Step-by-Step DIY Guide with Printable PDF
Project Introduction:
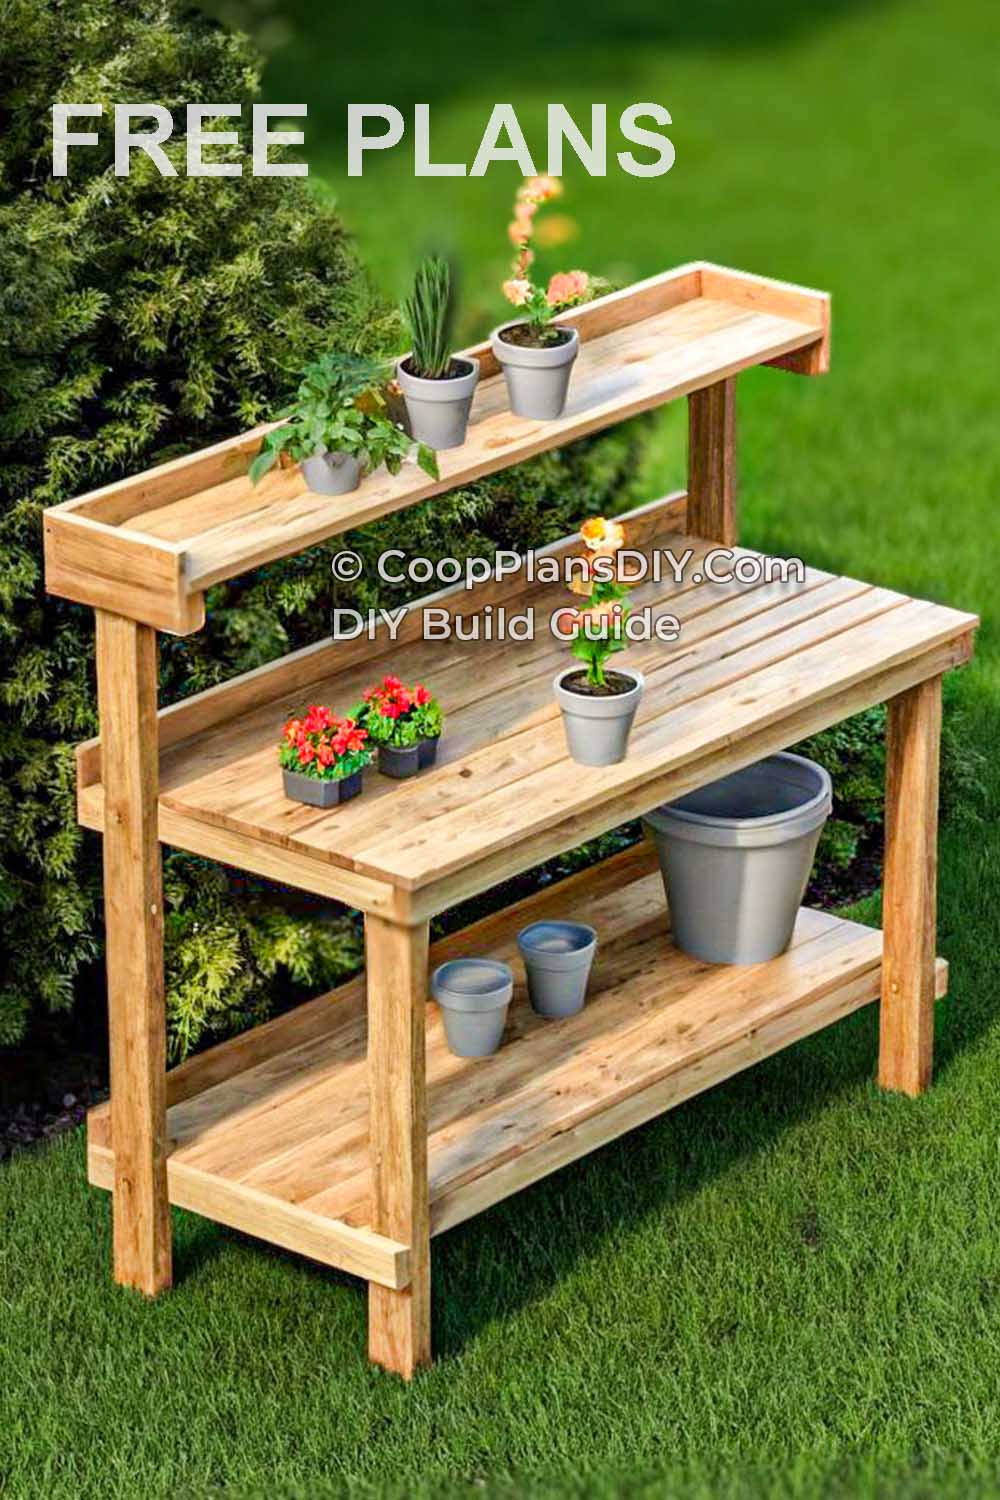
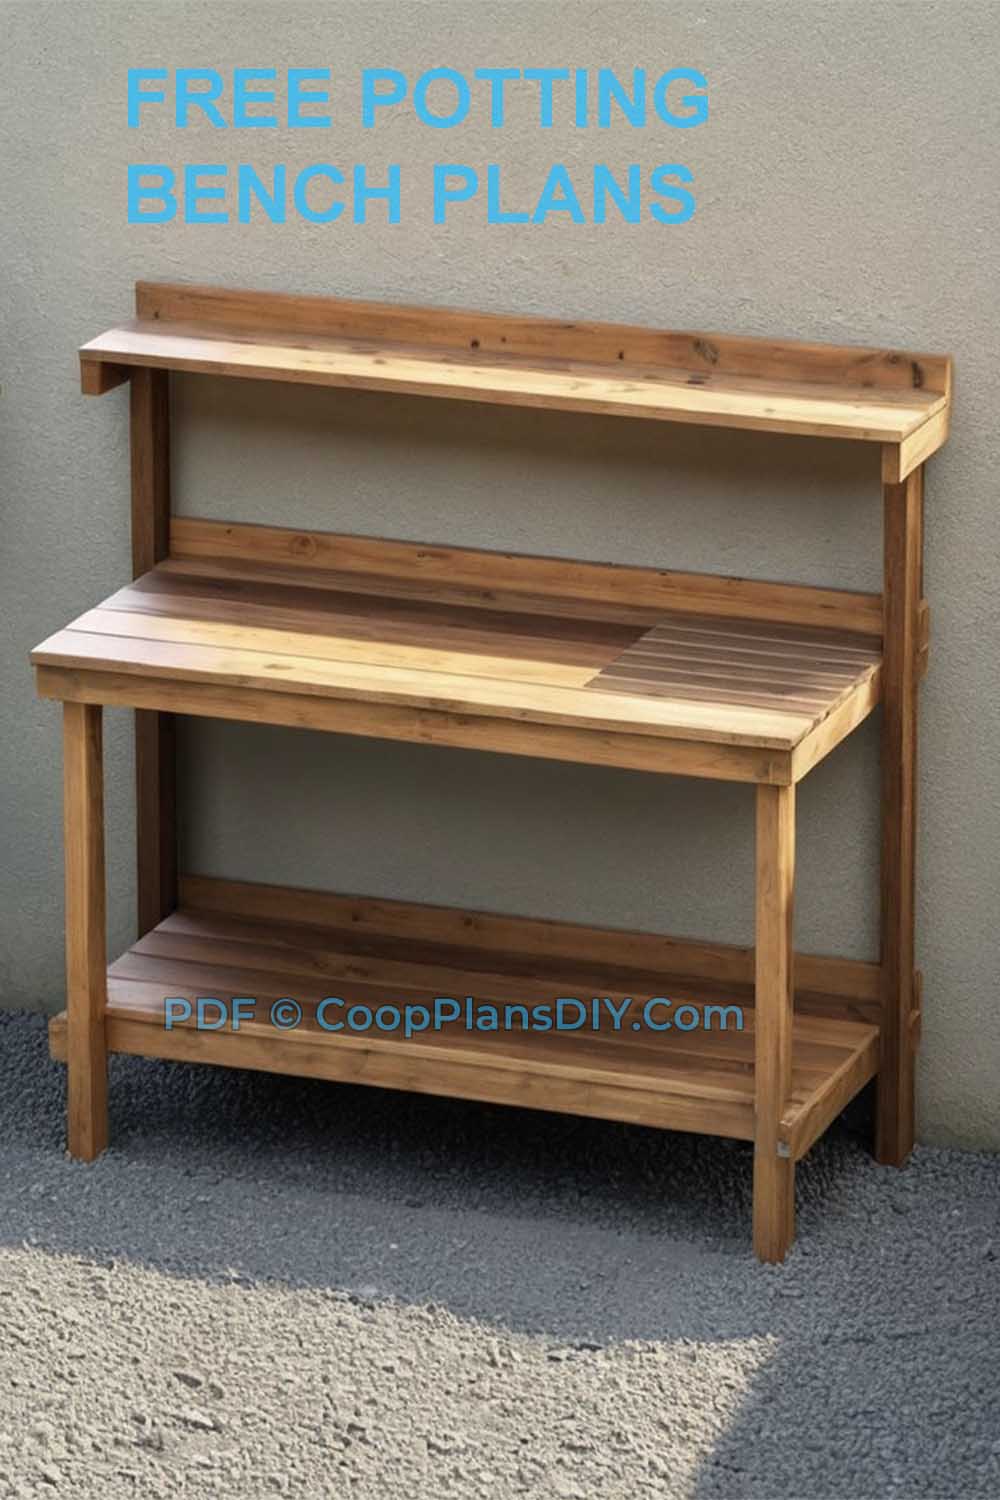
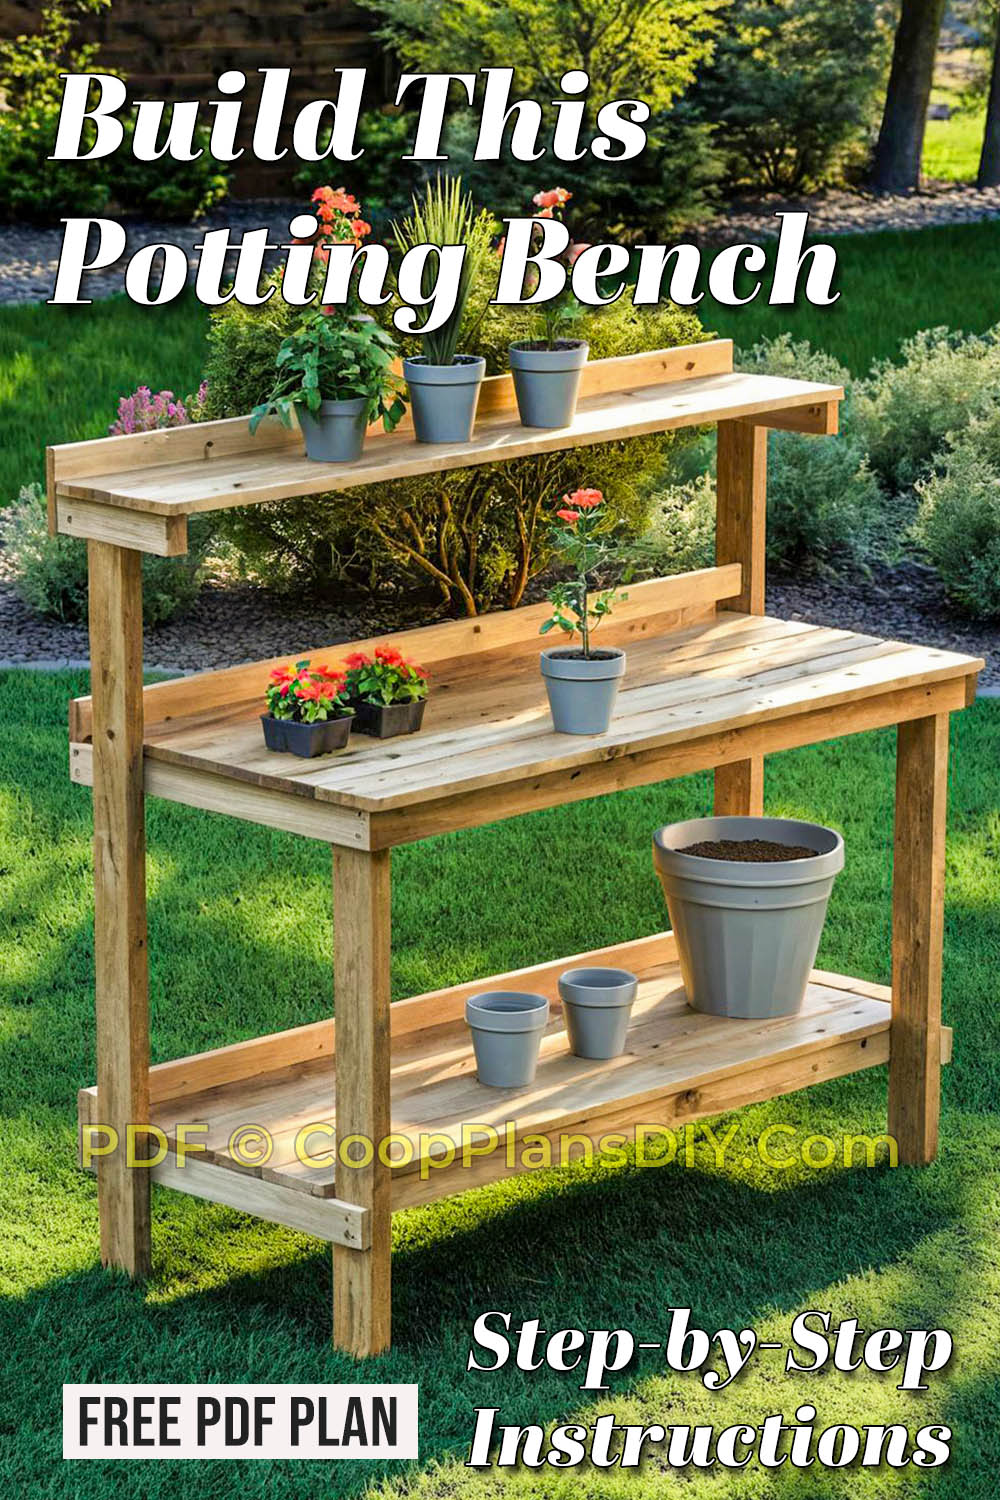
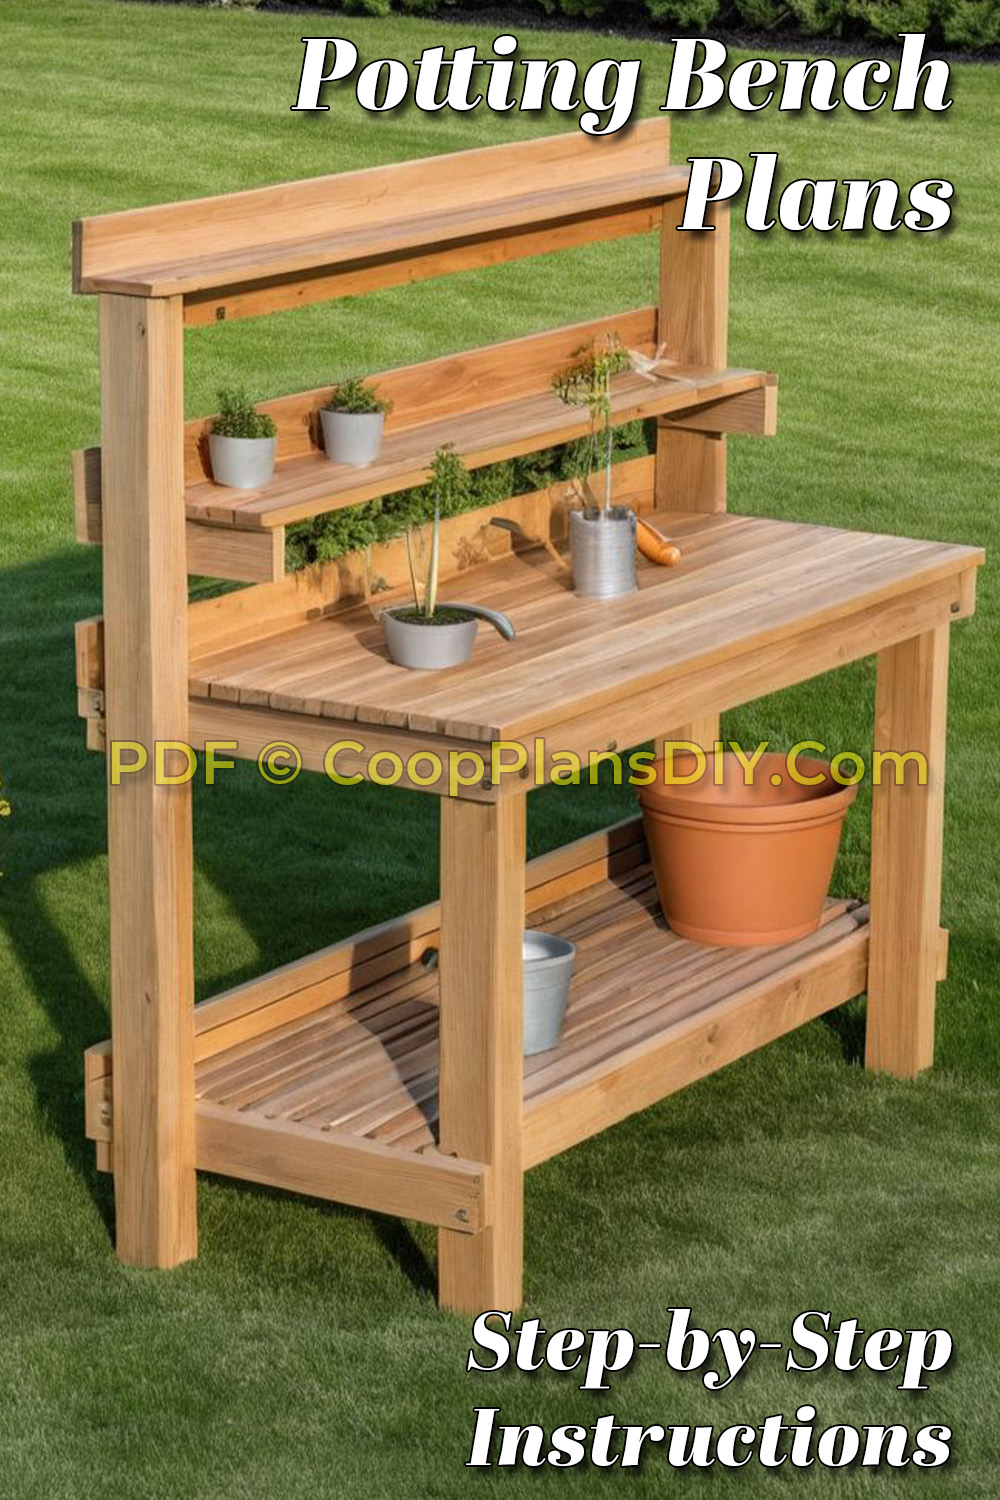
This step-by-step DIY guide shows you how to build a sturdy, stylish wooden potting bench that offers a dedicated, organized workspace for potting plants and mixing soil. The finished bench provides comfortable gardening without the backaches, measuring approximately 28¼″ wide 66″ long and standing 56″ tall at its highest point.
Work cleanly and efficiently with the Queen Nora bench. It’s designed with a spacious countertop, plus upper and lower shelving to perfectly store your pots, gloves, and essential gardening tools right where you need them.
This guide includes step-by-step instructions, a tools list, materials list, parts and cut list, clear diagrams, and helpful tips to make the build smooth from start to finish. It’s a moderate-level weekend project—a great way to sharpen your woodworking skills while creating something truly useful for your garden.
👉 Ready to build but need the details? Your Free DIY Potting Bench Plans (PDF) are just one quick step away! To receive the complete plans instantly, simply enter your email address in the newsletter form located at the bottom of this page. We’ll send them straight to your inbox!
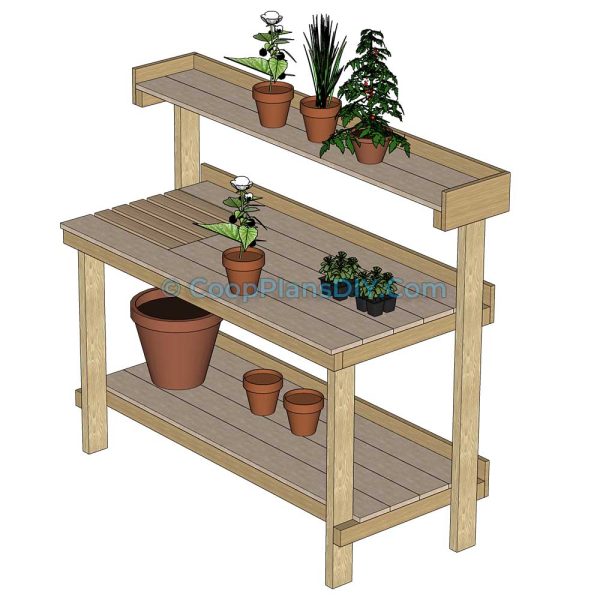
DIY Potting Bench Plans | Free Woodworking Guide
Material list (With Clickable Links)
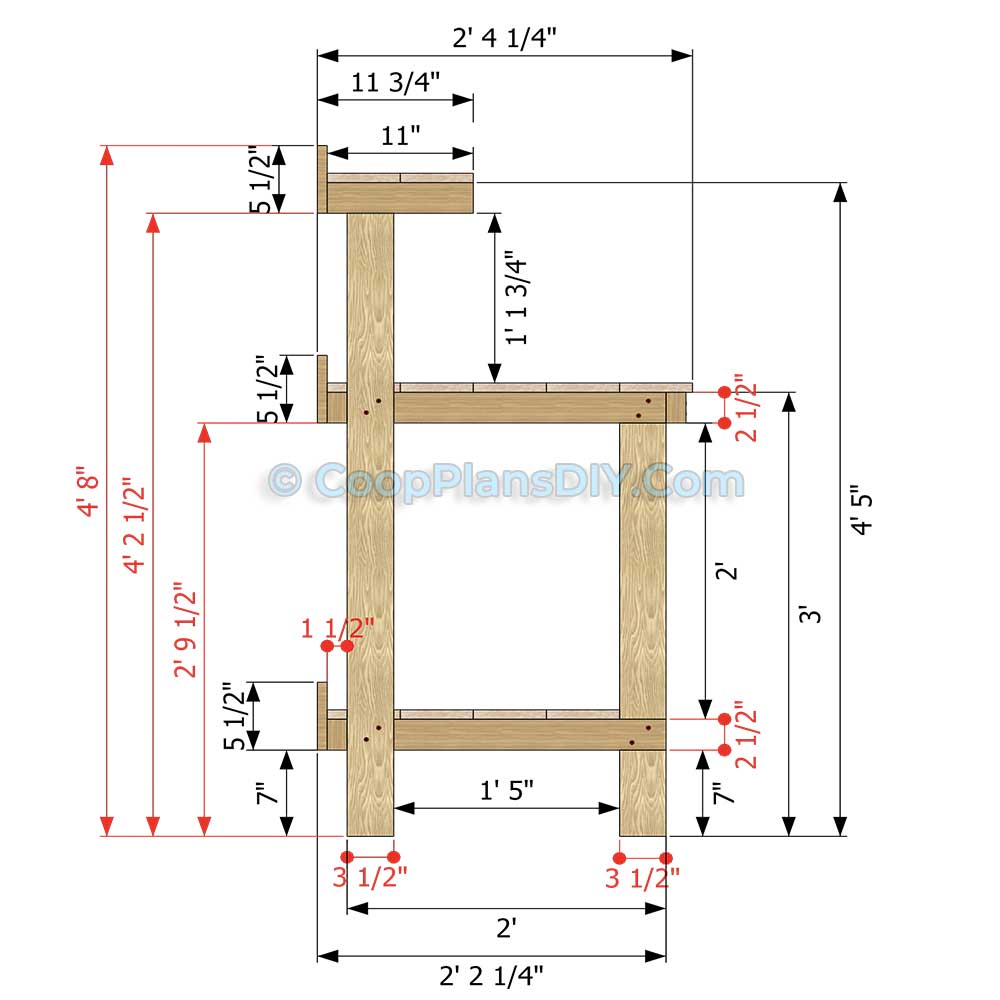
Potting Bench Side Elevation
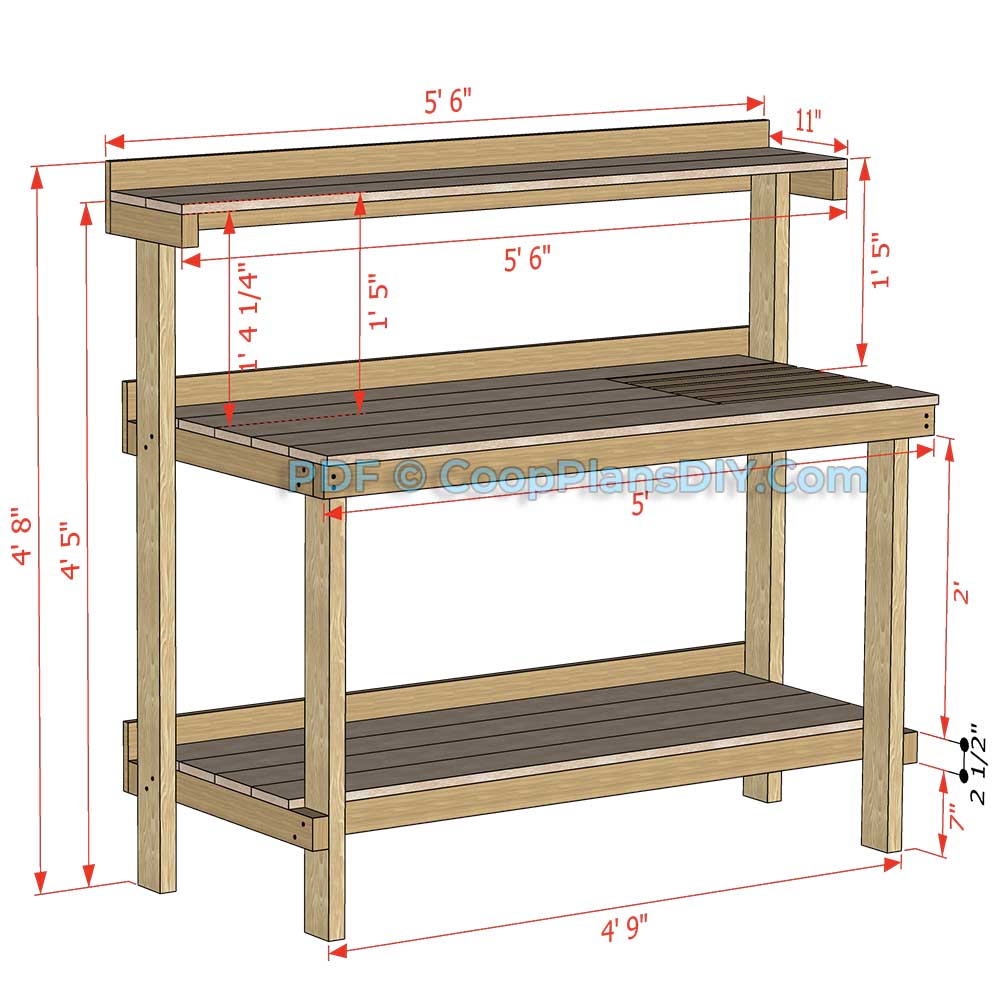
Potting Bench General Dimensions
Recommended Tools & Helpful Items


Step 1: Cut All the Wood Pieces to Size
Start by marking and cutting all your lumber according to the cut list below. Use a speed square to make sure your lines are perfectly square for accurate cuts. Refer to the illustration for each material ID.
Material Cut List
Cut From 2 × 4 boards
- 2 back posts – 53″ (A1)
- 2 front posts – 36″ (A2)
Cut From 2 × 3 boards
- 3 back rails – 63″ (B1)
- 1 front rail – 60″ (B2)
- 1 front rail – 57″ (B3)
- 5 rails – 24″ (B4)
- 1 cleat – 19″ (B5)
- 2 shelf supports – 11″ (B6)
Cut From 1 × 6 boards
- 5 back & surface boards – 66″ (D1)
- 6 surface boards – 60″ (D2)
- 3 surface boards – 41 ¾″ (D3)
Cut From 1 × 3 boards
- 5 surface boards – 18 ¼″ (E1)
- 1 cleat – 15 ½″ (E2)
💡 Pro Tip: Before cutting, think about where your potting bench will live. If it’s going to stay outdoors year-round, choose cedar or pressure-treated lumber for long-term durability. Cedar offers natural rot resistance and a beautiful finish, while pressure-treated wood is more budget-friendly but needs a quality weather-resistant sealer to last. And don’t forget—use exterior-grade screws and fasteners to prevent rust and keep your bench sturdy for years to come.
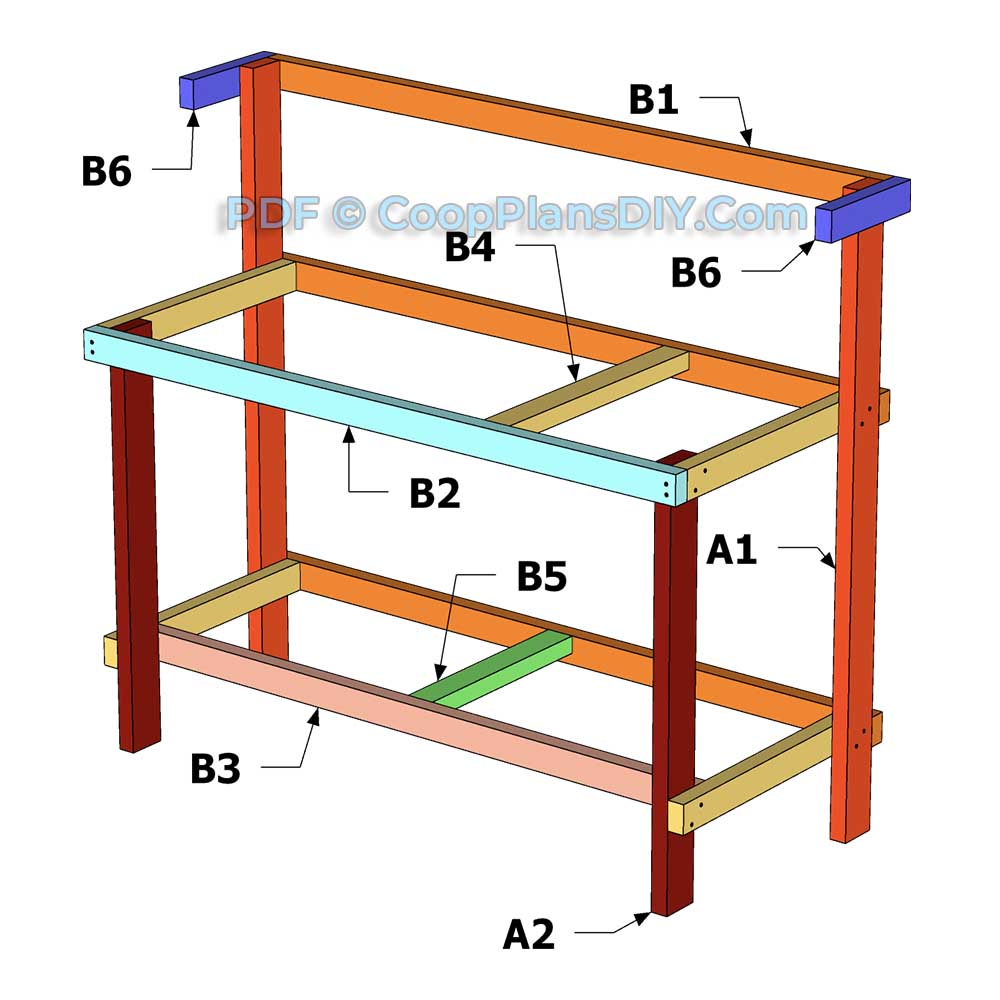
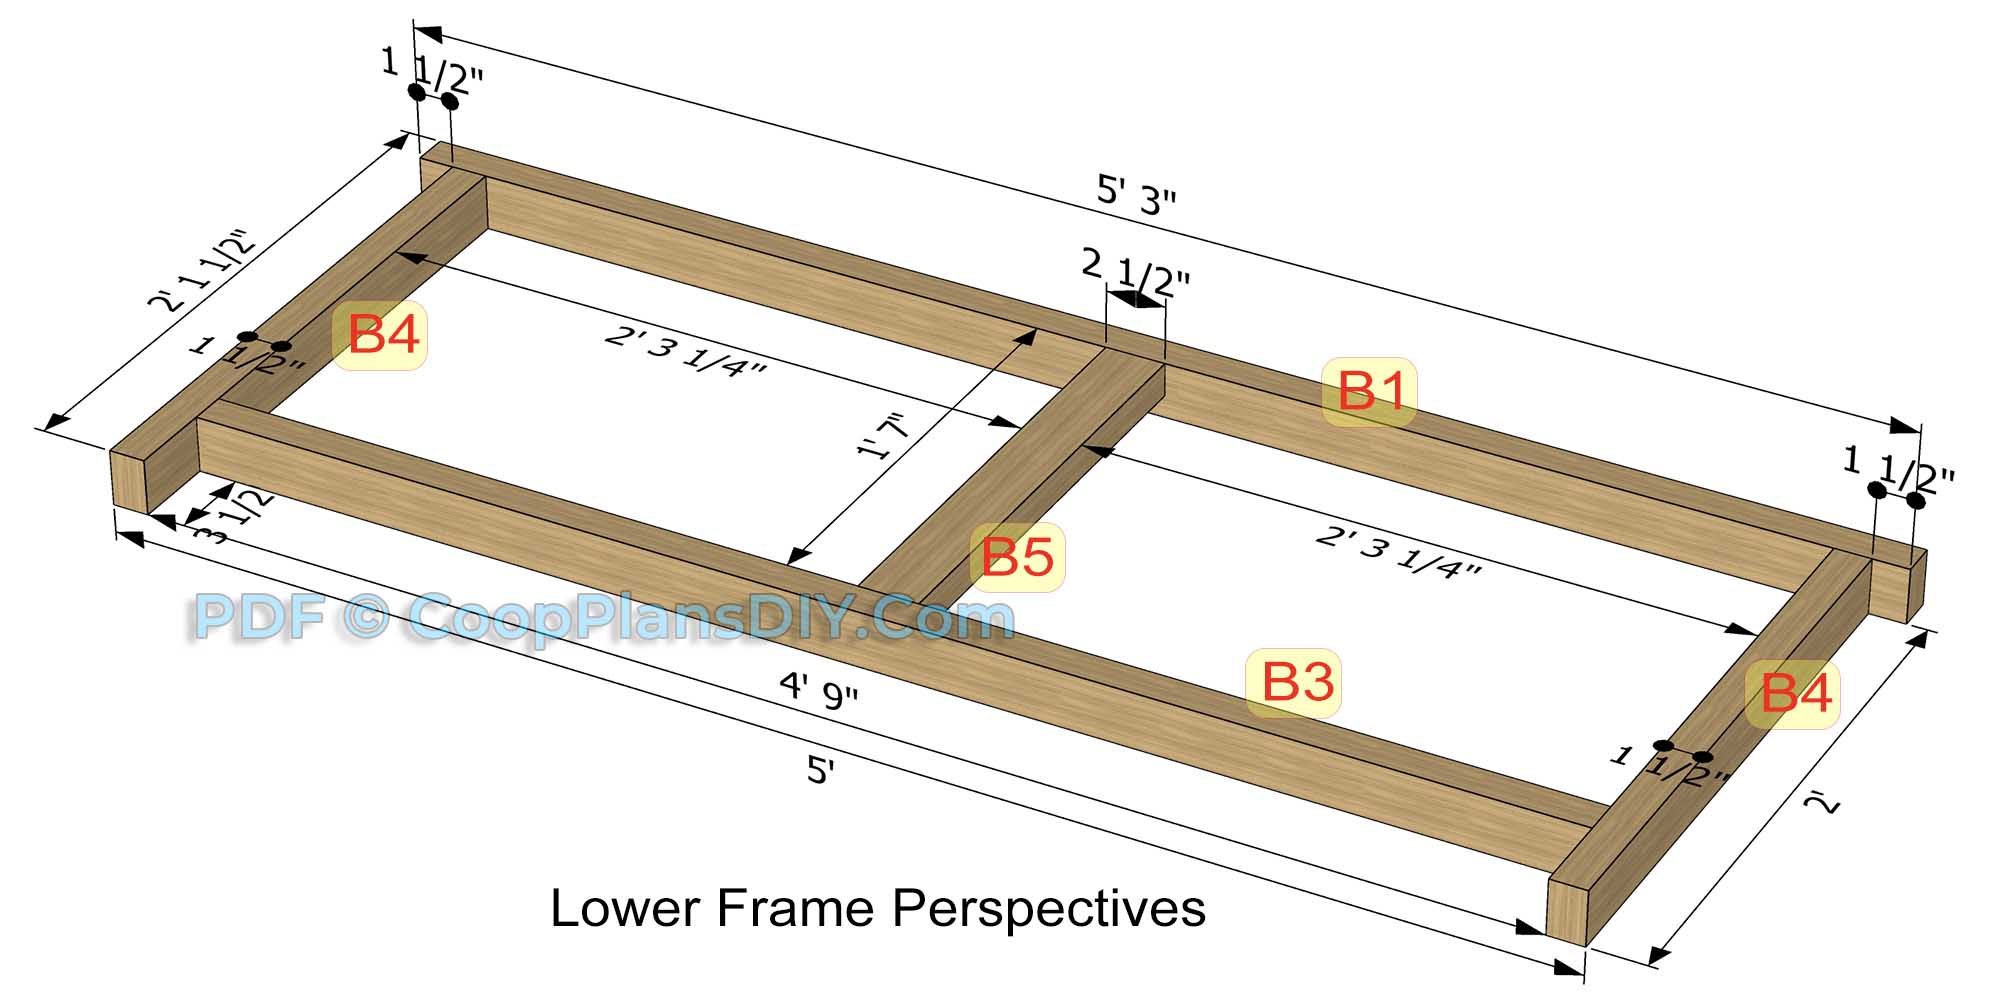
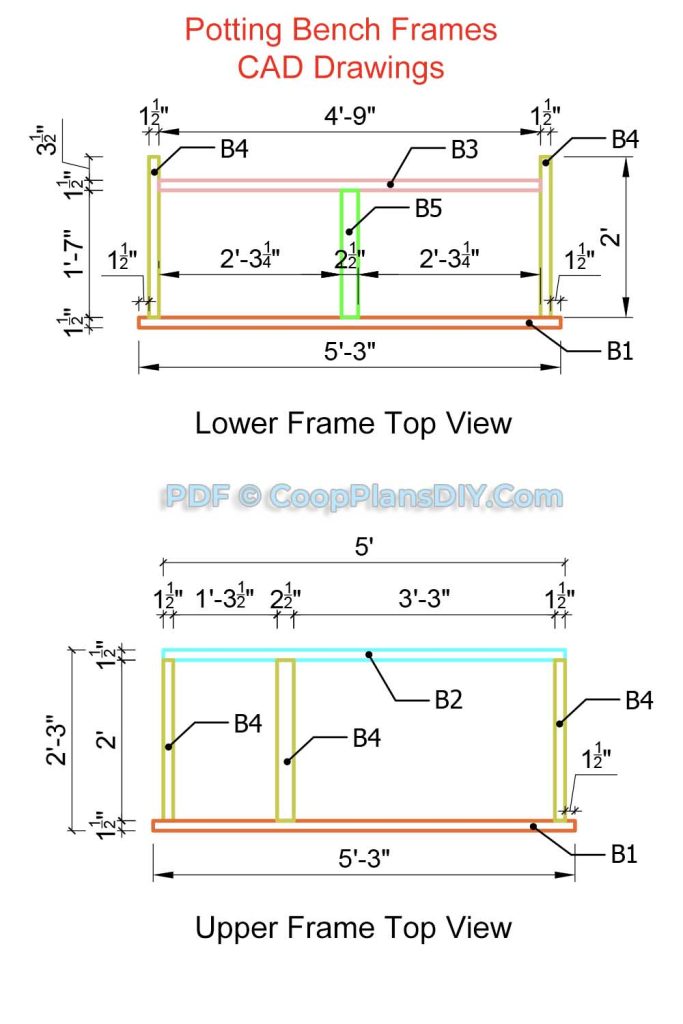
Step 2: Build The Upper and Lower Frame:
Upper Frame Perspectives
Step-2a
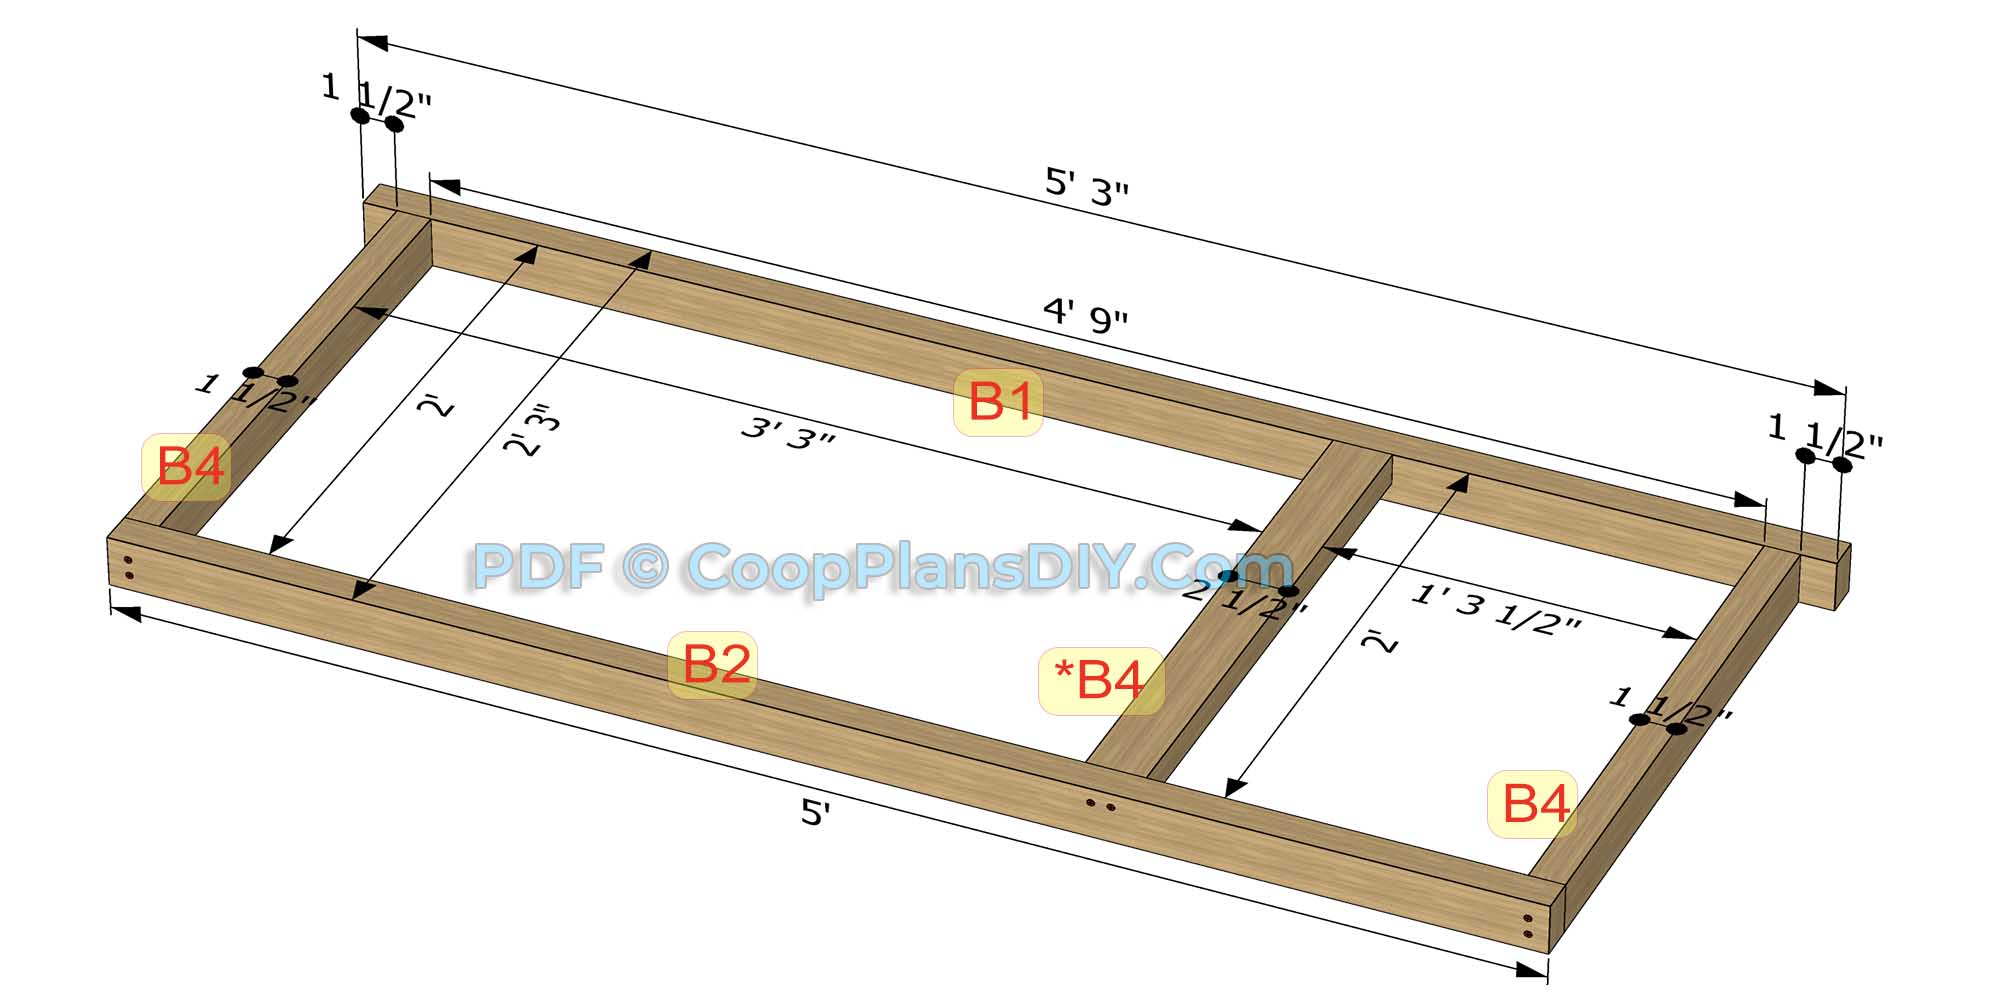
The first step in constructing the potting bench is to build this simple frames. These are all 2″x3″s. On a flat surface, assemble the upper frame to match the dimensions shown in the drawings above and below. Make sure to cut all wood pieces accurately according to these measurements.
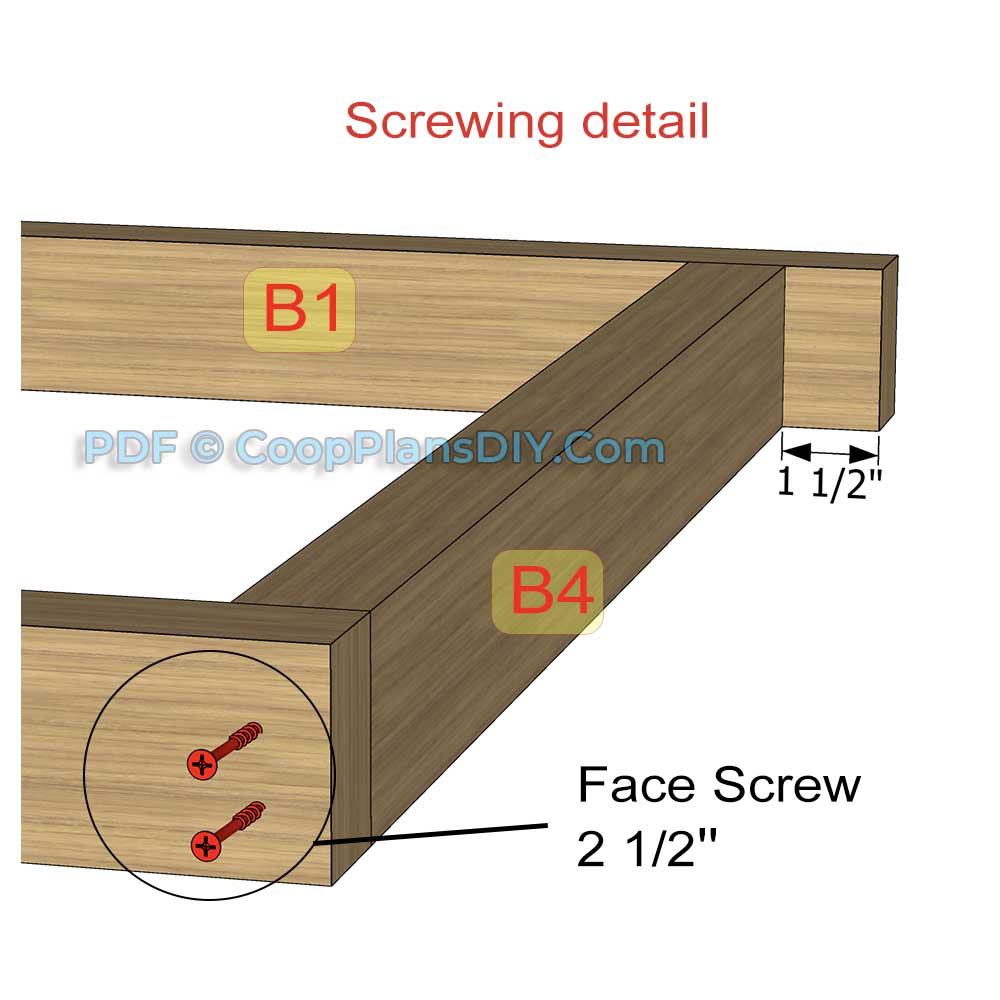
Then using nails or screws (2 1/2”), secure all points of contact with at least 2 nails/screws. Double-check that the frame is square before proceeding.
Note: If you want the upper work surface (without a hatch) to be gapless, position the *B4 piece in the center of the upper frame, just as you did with the lower frame. The design allows flexibility if you wish to include a hatch. If you plan to add a sink, adjust the gap based on the size of the sink you’re using. Alternatively, adjust the gap
depending on whether you want the waste to drain into a bucket placed underneath.
Step-2b
Repeat the previous step to complete the frame.
Use a circular saw or hand saw to cut along all of your markings and set aside the lumber, labeling each piece with your pencil so you can remember its intended purpose.
💡 Pro Tip:
You can save some time by cutting all the wood pieces at the same time with a miter saw equipped with a stop block, if the pieces in the project are the same length.
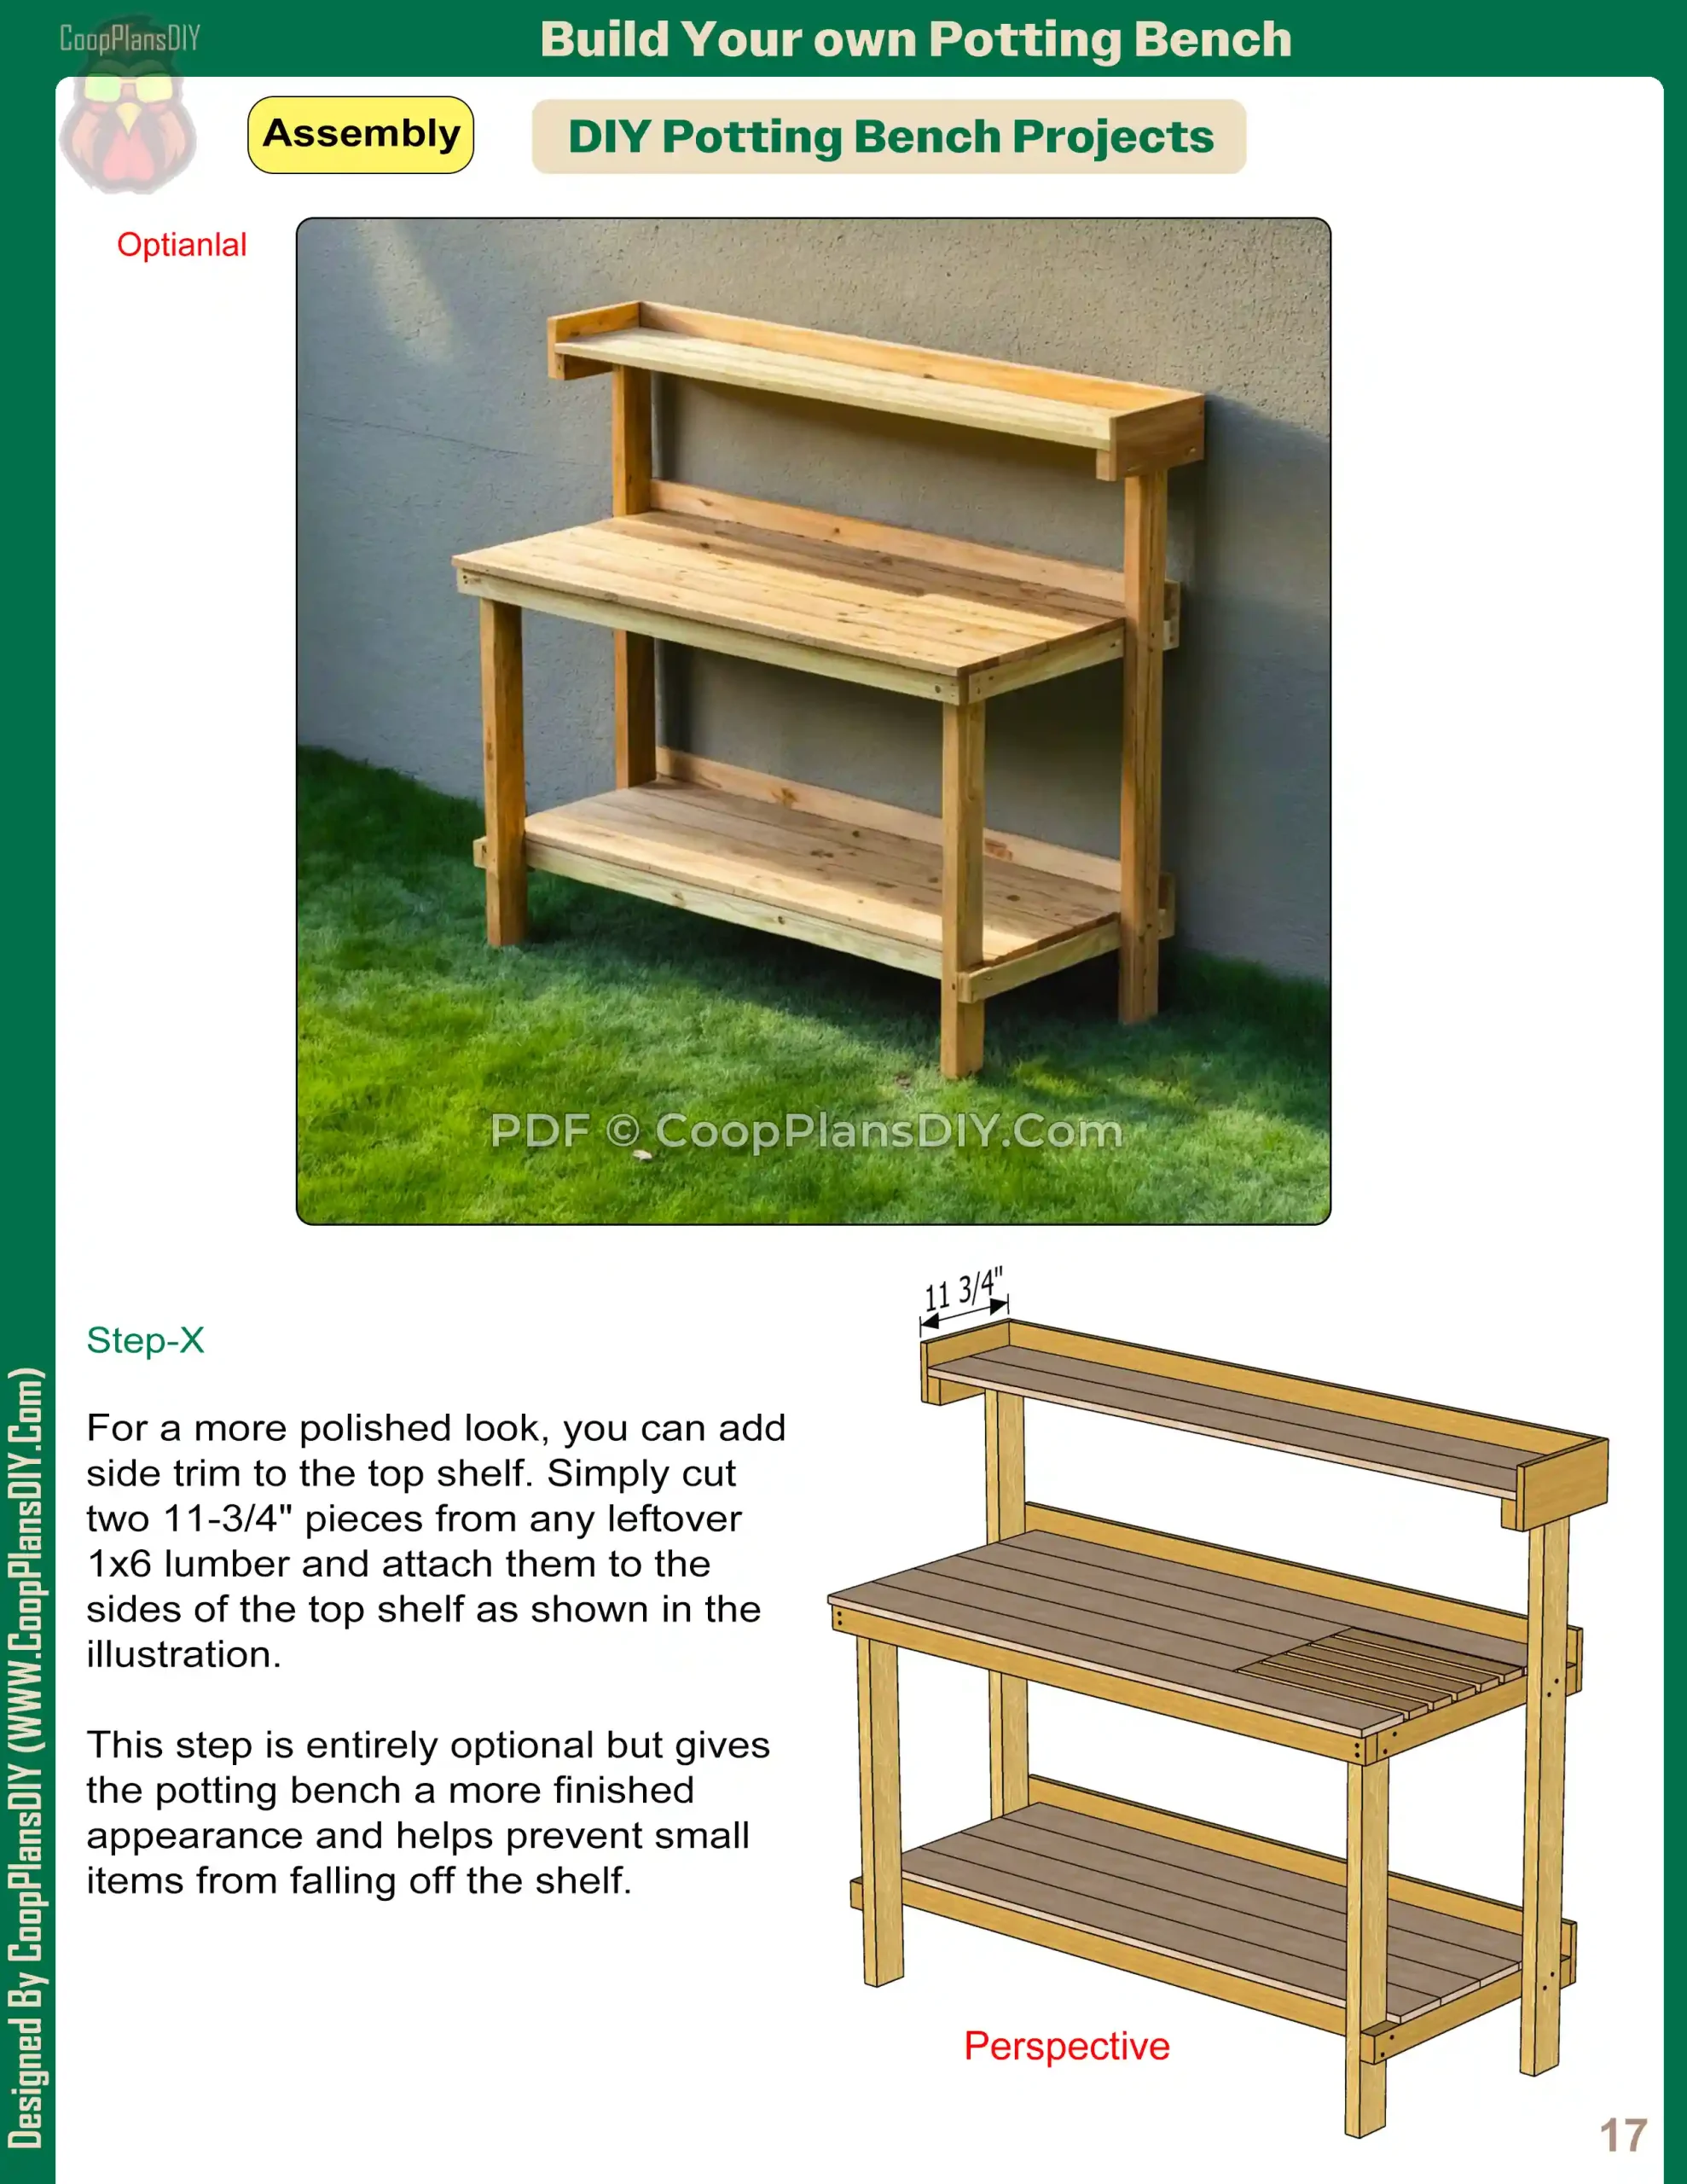
📄 Here’s a sneak peek at few of the pages from our free printable DIY Potting Bench Plans. The full guide includes step-by-step drawings, measurements, and pro tips to help you build this project confidently.
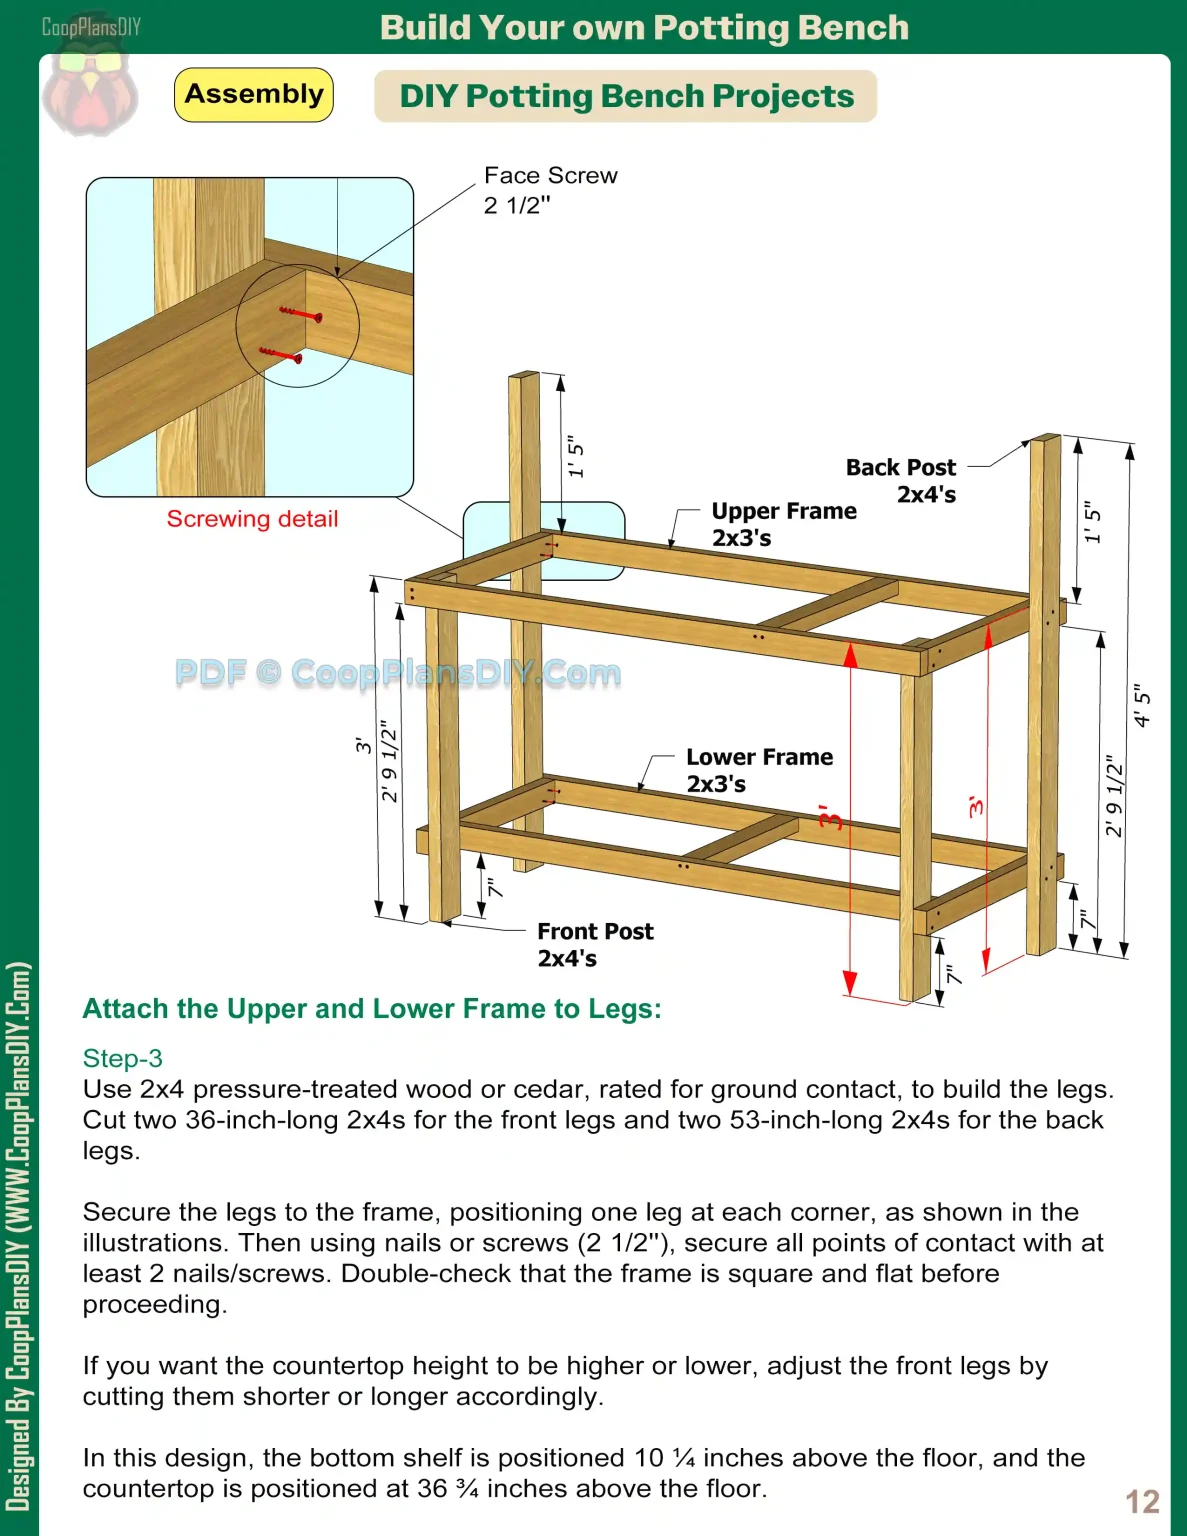
Step-3 (Attach the Upper and Lower Frame to Legs)
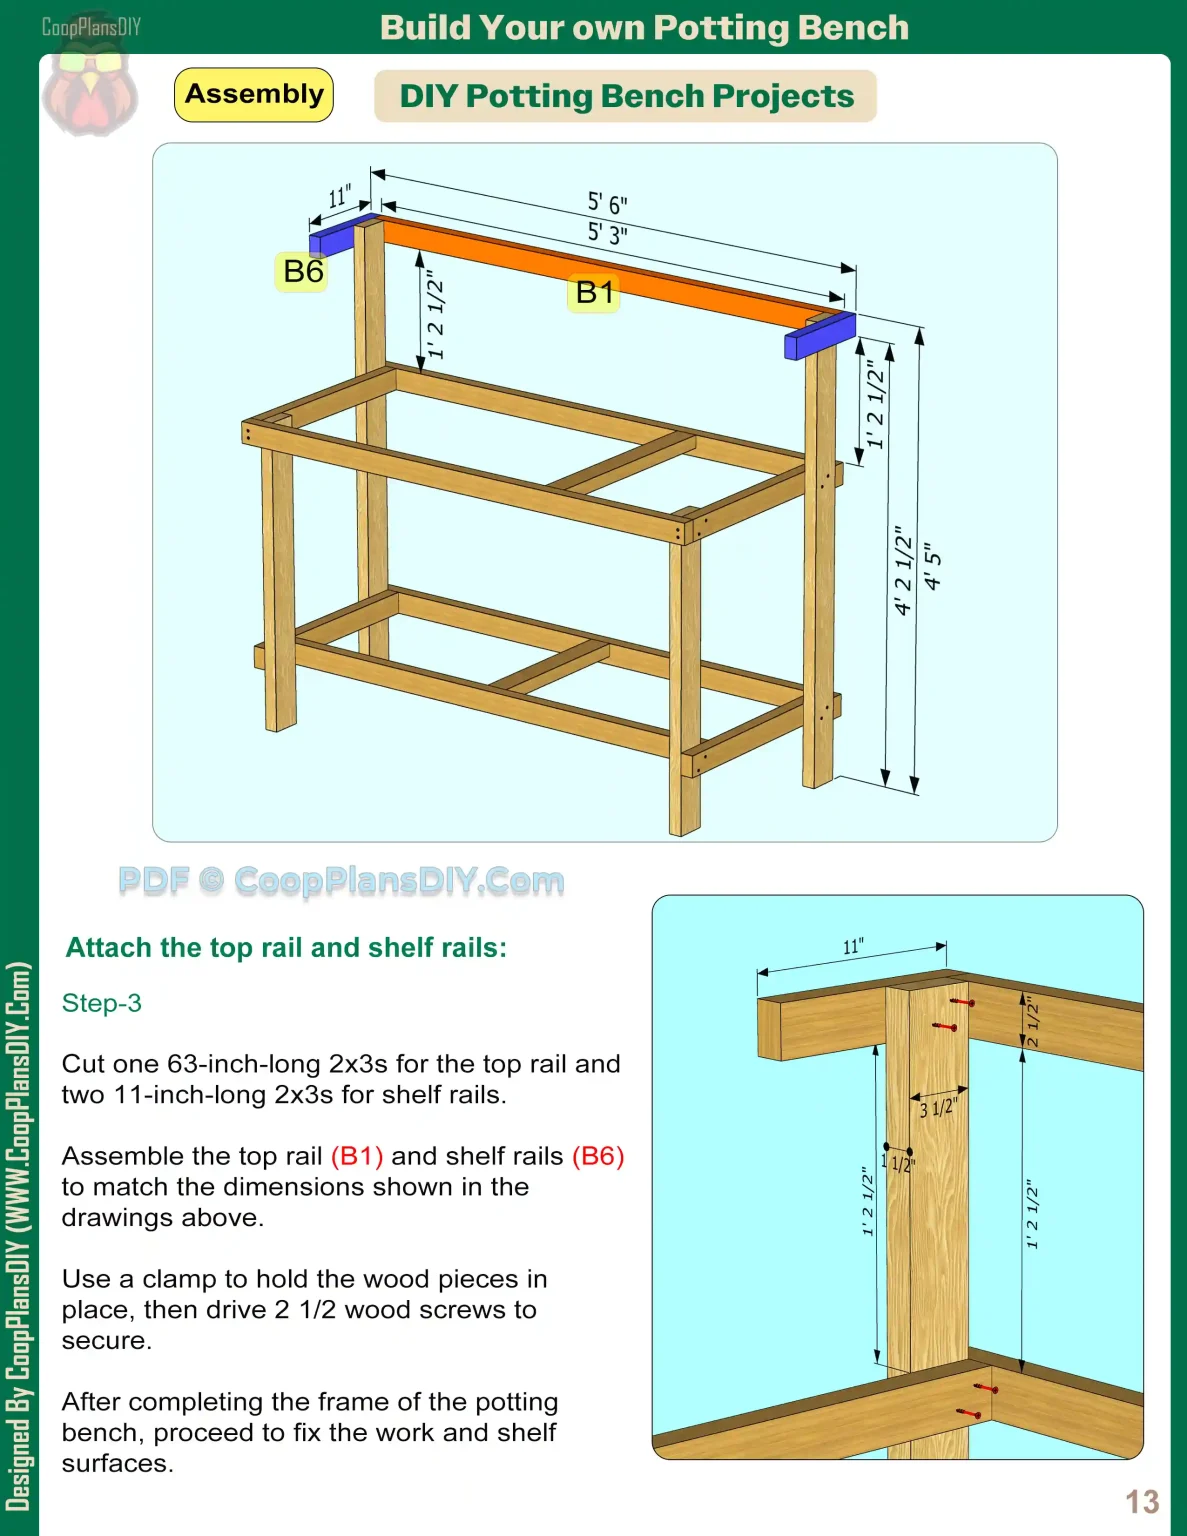
Step-4 (Attach the top rail and shelf rails)
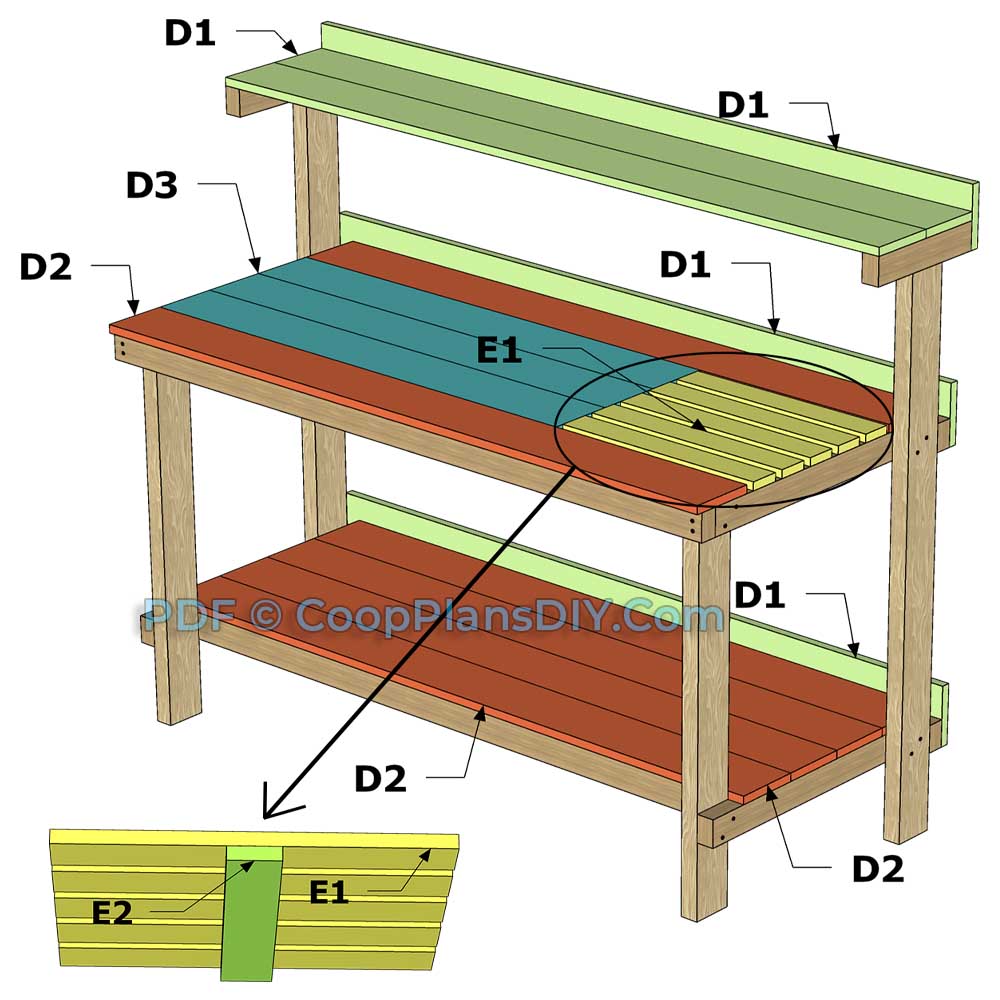
Step-5 (Attaching the Surface Boards)
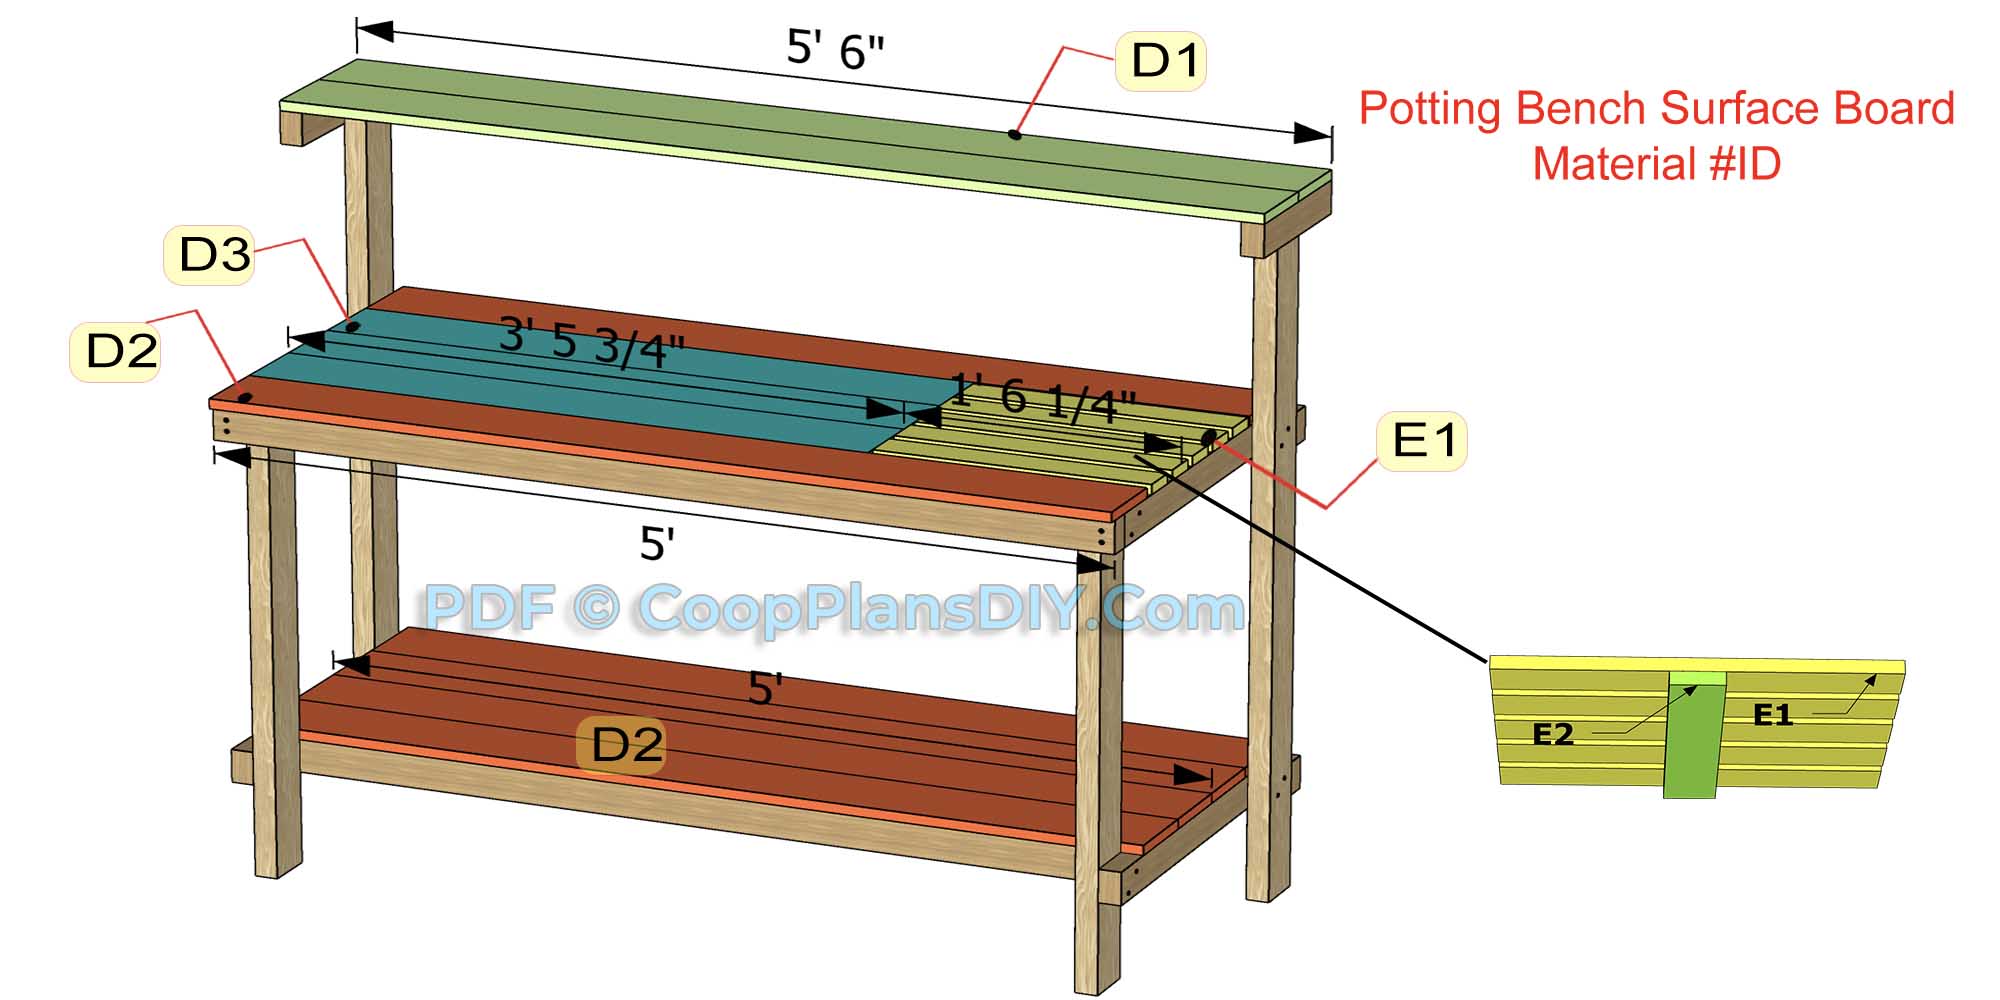
The work surface will serve as the main area for your gardening tasks. The bottom shelf can hold pots, tools, or soil. Use 1×6 flat boards or cedar, rated for ground contact, to build the surfaces.
Cut the following pieces from the 1×6 cedar boards:
Two 66-inch-long board (D1)
Six 60-inch-long boards (D2)
Three 41 3/4-inch-long board (D3)
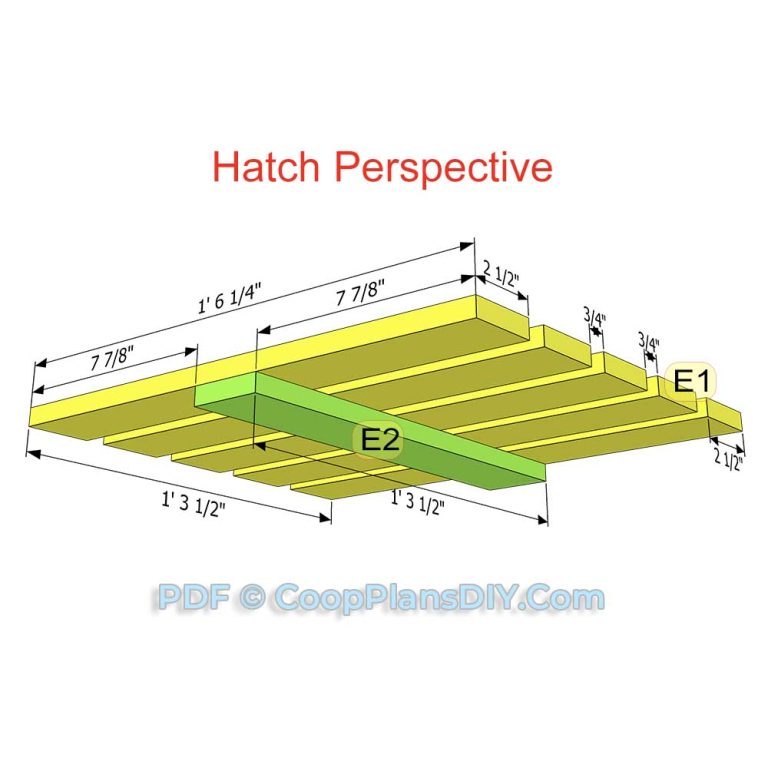
For the hatch, cut: (1×3 cedar boards)
Five 18 1/4-inch-long boards (E1)
One 15 1/2-inch-long board (E2)
Note: If you prefer the top work surface (without the hatch) to be gapless, you will not need pieces D3, E1, or E2. Instead, use three additional pieces of D2 to replace them.
Make sure to cut all wood pieces accurately according to these measurements.
Step-5 (Continued)
Next, using 1 5/8-inch nails or screws, secure all points of contact with at least two nails or screws per connection.
Note: You can also use 1x4s or 3/4-inch exterior plywood to build the work surface and shelf surfaces.
Optionally, you can leave about 3/4-inch of space between the surface boards. In my design, I chose to create a grid on the right side of the countertop, but I fixed the other surface boards without leaving any gaps.
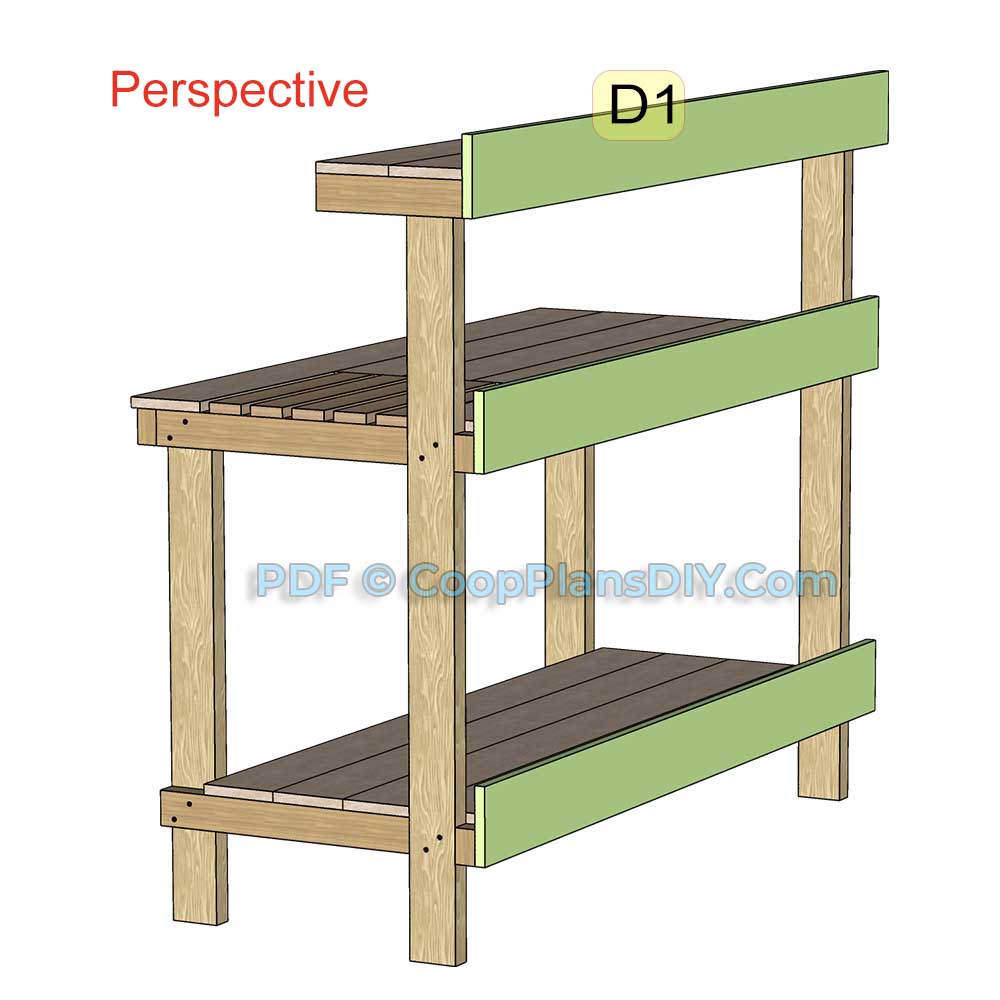
Step-6 (Attaching the Backboards:)
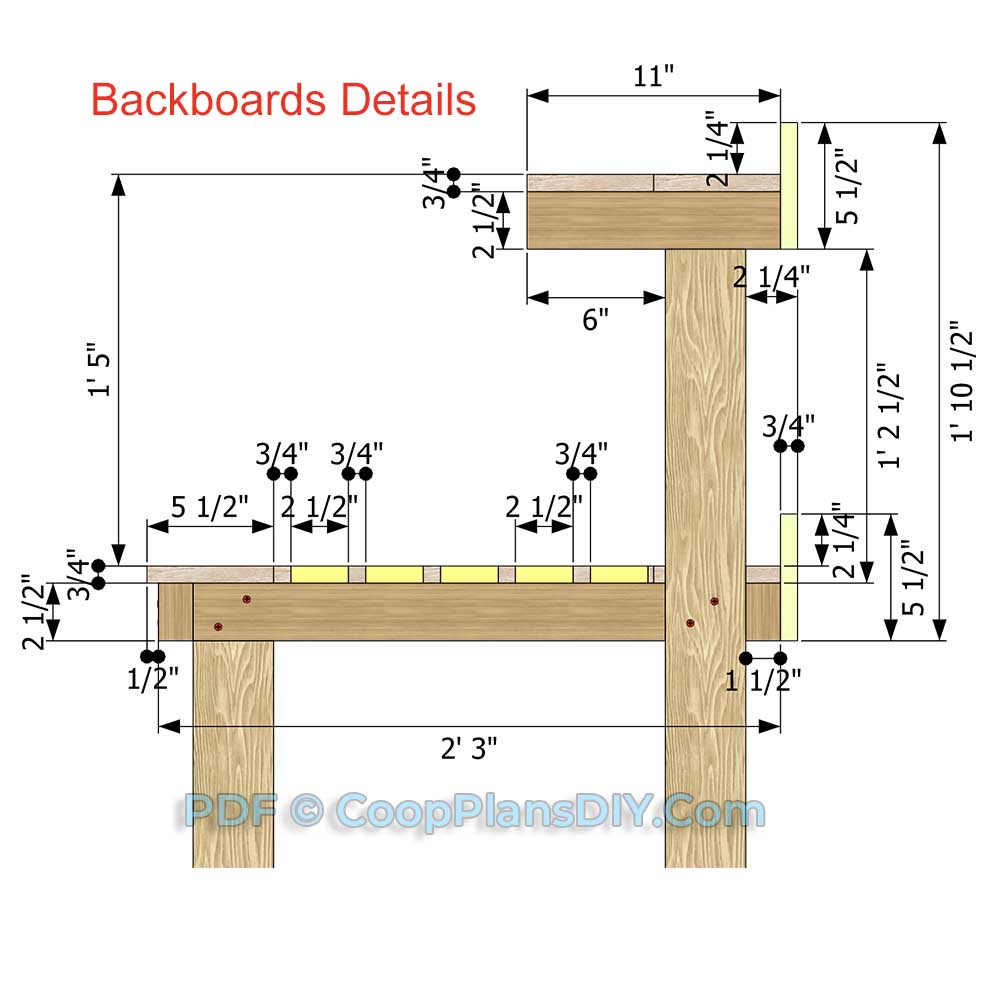
Finally, attach the backboards as shown in the drawing above to prevent items from falling off the shelves.
Cut the following pieces from the 1×6 cedar boards:
Three 66-inch long boards (D1)
Ensure all wood pieces are cut to these dimensions. Then, secure all contact points using 1 5/8-inch nails or screws, with at least two nails or screws per joint.
Step-7 (Stain and Sealer )
Step-7 (Sand and Finish the Bench)
Fill all holes with wood filler and let dry. Apply additional coats of wood filler as needed. When wood filler is completely dry, sand the project in the direction of the wood grain with 150 grit sandpaper. Remove all sanding residue on work surfaces as well. Wipe project clean with damp cloth.
• Painting or staining should be one of the final steps in building your potting bench.
• Cover the entire surface, even the parts where you will be applying trim. This will help prevent water from getting behind the trim and rotting the board.
It is always recommended to apply a test coat on a hidden area or scrap piece to ensure color evenness and adhesion. Use primer or wood conditioner as needed.
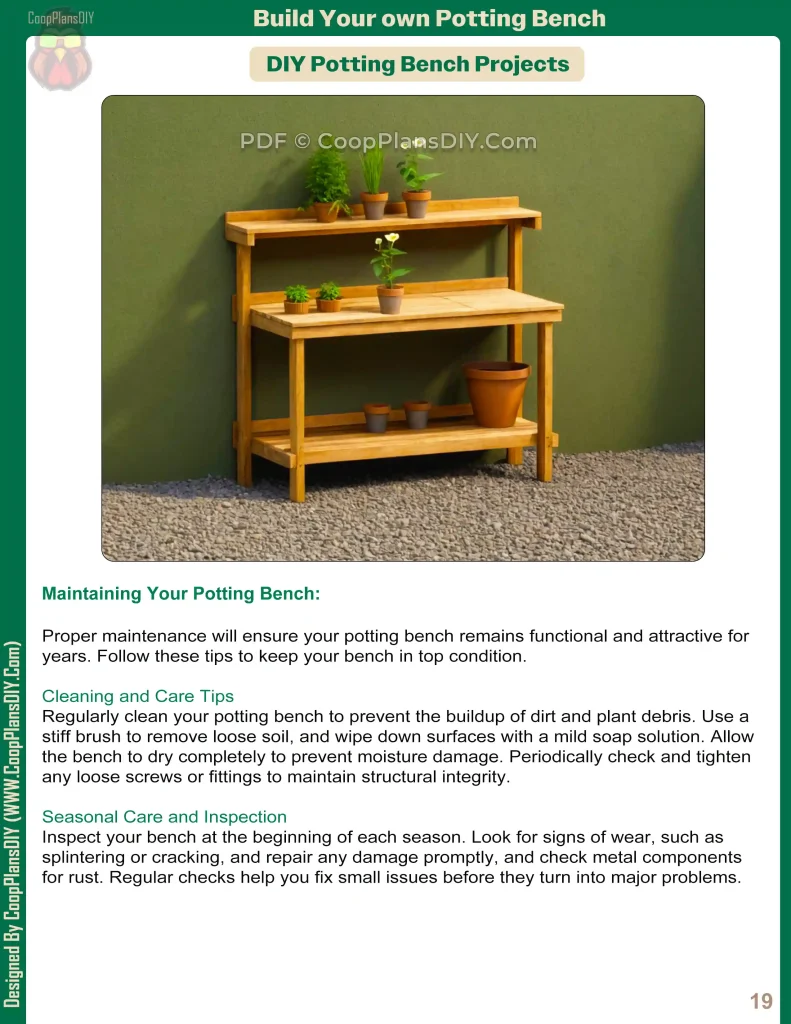
Enhancing aesthetic appeal:
Enhance the look of your potting bench by painting or staining it to complement your garden’s style. Use vibrant colors to make it a focal point or natural wood finishes for a rustic look. Add decorative elements such as garden-themed motifs, stencils, or
personalized nameplates. These touches make your potting bench not just functional but also a beautiful addition to your outdoor space.
Thanks for Building With Us!
If you have any questions or need help, we’re always here for you.
I’d love to see your finished project — send photos anytime!
📸 Submit photos through Etsy or email: contact@coopplansdiy.com
📌 Share and tag us on Pinterest: @CoopPlansDIY
Free Potting Bench Plans – Queen Nora!
This free potting bench plan is based on one of my most popular potting bench designs — reworked with lighter materials so it’s easier and faster to build, even for beginners.
Premium DIY Potting Bench Plans – King Nora!
Looking for a more durable, full-sized version? Heavier 4×4 legs – Extra shelf storage – Thicker, reinforced rails – Bonus custom accessories.
Browse Premium Potting Bench Plans On Etsy
Ready for Your Next DIY Project?
This free plan is the perfect weekend project. When you’re ready to build something amazing… → Browse my complete library of step-by-step Premium Plans on Etsy.
Love these free plans? Pay it forward!
If you found this guide helpful, please share it with fellow DIYers. Sharing not only supports our small business but also helps other enthusiasts discover the free resources they need for their next project. Thank you!
Want the DIY Potting Bench plans now?
Enter your email below to get the Free Starter Plans instantly delivered to your inbox. See how easy it is to build!